Saturday, December 27, 2014

My Belt Cutting Setup ain't "Cutting It"

I make a lot of belts and it became clear all too soon that my 24" long cutting mat and 48" straight edge were not "cutting" it.

I found a nice 60" straight edge at Home Depot for $11.  Johnson Tool.

I also found a place that offers remnants of poly cutting board for fairly cheap.
www.thecuttingboardfactory.com

I purchased two pieces of 8 1/2" x 60" x 1/4" for $11 each.  Shipping was $20, so I bought two boards.

Lay the leather on the cutting board and clamp the rule to the workbench.  Rather than cutting 24", then moving the cutting mat, cutting the next 24", and so on,  cut a straight edge in one motion with a 60mm rotary cutter.  Once there is a straight edge on the leather, switch to a strap cutter.


Saturday, December 6, 2014

Upgrade Cowboy CB3200 Edge Guide - Modification


Upgraded Edge Guide

I was having a real problem with the Cowboy CB3200 edge guide.  I believe it was designed for the CB4500 which has a slightly different casting in the cylinder arm.

The problem:
The thumbwheel tightens from the bottom and the thumbwheel comes into contact with the cylinder arm casting which limits the edge guide to about 1/2".  I usually set my edge stitching from 1/4" - 5/16".  The edge guide comes with a wing nut which allows for a closer setting, but is extremely hard to tighten; one of those things that you need three hands for and it also hits the cylinder arm casting.


The Solution:

Replace the threaded post and thumbwheel.

Replacement Parts:

T-Slot Bolt (M6X1 Thread), 5/16" washer, thumbwheel (M6X1 Thread)

Bronze sleeve bearing (1/4" ID, 3/8" OD, 1/4" Length).  You will need to lap the bushing from 1/4" to 21/128".  I used 80 grit sandpaper. This took about 10 minutes.

Procedure:

3/8" hole is too large for new T-slot bolt which allows too much play.

 After lapping the sleeve bearing, tap it into the 3/8" hole until it is flush top and bottom.

Place the spring washer in its original position.

The 5/16" washer was one that I had and it fit inside the stepped hole (slip fit).  It compresses the spring washer when the thumbwheel is tightened.

Insert the T-slot bolt from the bottom through the slotted keyway and thread the thumbwheel from the top.  The T-slot bolt has a flattened side which rides along the keyway and keeps the bolt from turning when tightening the thumbwheel.

Note that the guide bearing can be adjusted right up to the front walking foot without the T-slot bolt hitting the cylinder arm casting.


I also added a washer above the guide bearing to reduce the clearance from the needle plate to the bottom of the bearing.  This helps keep thinner materials from sliding underneath the bearing.

I couldn't find a 1/4-28 threaded T-slot bolt so the 6 mm - 1 pitch was substituted.

Parts Source:
McMaster-Carr


  • 2868T1 - Bronze Sleeve Bearing, for 1/4" Shaft Diameter, 3/8" OD, 1/4" Length
  • 92770A111 - Machined Neck T-Slot Bolt, M6X1 Thread, 25MM Long
  • 90368A300 - Stainless Steel Round Knurled Thumb Nut, M6X1 Thread, 24MM Head
  • I had the 5/16" washer 


Works perfectly now and is very easy to adjust.  Total cost: about $25.  The guide can be swung 180ยบ and left on the machine for normal sewing.

Hope this helps,
Mike

Friday, October 24, 2014

DIY "Glass" Slicker for Leather

So, I'm all about making something out of nothing and for free.  I needed a glass leather slicker but didn't want to pay the $20 and up price.


I had a discontinued sample of 1/2" thick Corian that was already cut to 4" square.  I then rounded the corners, and used a 1/4" radius router bit to produce a fully rounded edge.  Sanded it down to 220 and wet molded a grip out of 8 oz veg tan leather.

Works great.

I'd bet one could order a sample from Dupont for free or next to nothing.

Hope this helps,
Mike

Friday, October 3, 2014

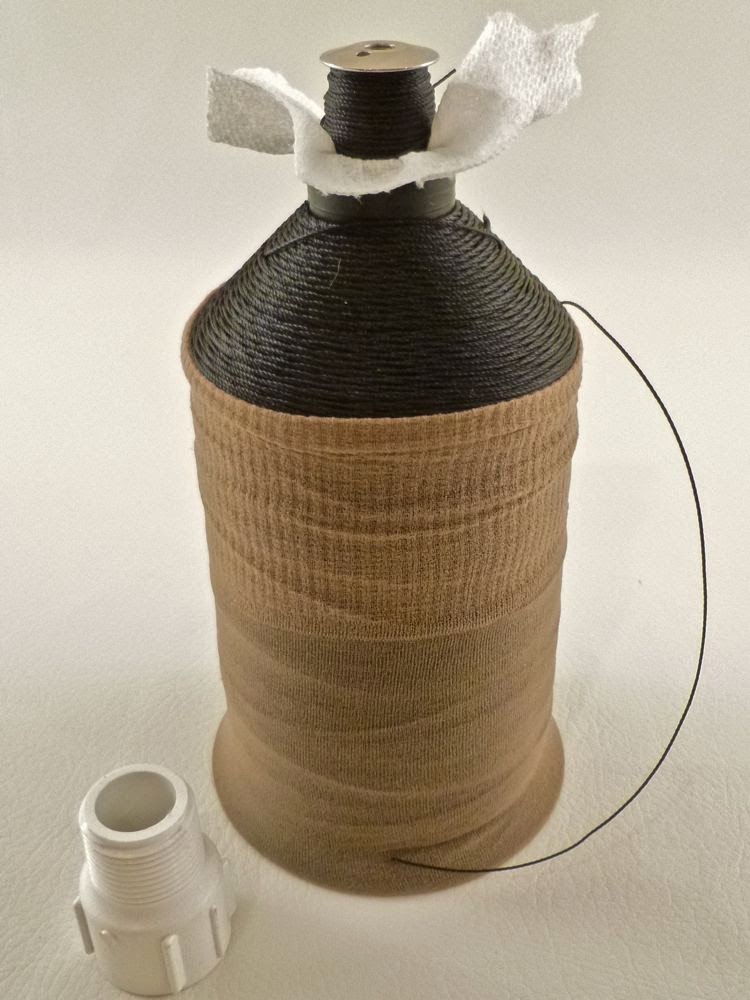
How To Keep Track Of Type M Bobbins Loaded With Thread


What to do with all of those pesky bobbins.  I've got multiple spools of thread in multiple colors and I like to keep the bobbin loaded with the same size and color thread with the matching spool.

Played with some wire hangers that slipped through the bobbin and hooked into the hole in the top of the spool, but they were unwieldy.

I then tried a piece of paper towel wrapped around the bobbin which allowed the bobbin to friction fit into the spool when stored, but the paper towel kept tearing.  Then replaced the paper towel with a barrel cleaning patch and it worked but the patch was a pain to keep track of.

Finally came up with a solution that is working for me.  You can take a 3/4" male thread to female slip PVC adaptor and slip it into the top of the spool (a little tight, but one could always sand the threads down a bit) and then drop the bobbin into the slip part of the adaptor and it won't fall into the spool.

The nice thing about this solution is that the adaptor can stay in the spool while threaded into the machine.

Attached are a few pictures.

Hope this proves helpful to someone.


Thursday, September 25, 2014

Needle Organizer for Leather Sewing Machine Needles

I needed to find a way to organize and keep track of my collection of leather sewing machine needles.

The problems were that the packets ended up all over the place, what to do with a needle that is still good but not new, and to identify which needle is currently in the machine.

I created this little needle wallet.  It fits the 10 pack of needles packets plus each pocket fits one additional needle.  In this way, a needle that has been used but not worn out can be easily identified and stored for future use.  I cut a plastic rod from a q-tip to insert in the pocket where the needle came from to identify which size is currently in the machine.  I suppose one could use different colored rods to identify needles being used in multiple machines.

Hope this helps.

Note the Extra Needles and the Blue Rod


New Automatic Bobbin Winder For Cowboy CB3200


I don't like the bobbin winder on the Cowboy CB3200 so decided to come up with an alternative.  The problem with a typical commercial sewing machine bobbin winder on a machine set up for leather is that it winds while the machine is engaged in stitching or, if not stitching, the stitching mechanism is running. Leather machines run rather slow and it takes too long to wind the bobbin and it seems like a lot of extra wear and tear on the machine.  Also, if left unattended, the bobbin doesn't wind with the thread evenly distributed on the bobbin spool.

I looked at several dedicated bobbin winders and found the Luis Sew model on ebay for $35 new including shipping.  This machine typically sells for $80 so I snapped it up.

Upon running it for the first time, I discovered that there is no speed control and the thing runs at warp nine... no control of the thread winding.  The tension discs are also too close to the bobbin which leads to uneven winding on the bobbin spool.

I decided to install a PWM (pulse width modulator) speed control which can be had for around $10.  The advantage of a PWM is that it maintains full torque while reducing the speed of rotation.  It also doesn't heat up the motor like a typical fan-type dimmer switch.

The machine also has a lot of vibration which creates excessive noise during operation.  I decided to make a new wider platform from 1/2" 9-ply baltic birch plywood.  I also mounted the motor on rubber washers.  The unit is now virtually silent.

So now the unit runs quietly, there is no vibration, the speed is variable down to zero RPM.  I can help the winding process manually to keep the threads winding evenly; it winds pretty well unassisted.  I have added nylon knee-high stockings to all of my spools of thread to keep them feeding consistently as well.

This unit works on type M, as well as residential type bobbins.

Hope this helps anyone looking for a better bobbin winding solution.

Here are some photos of the finished product.

Scroll to the end for Links to products discussed in this article.


The control knob on the top is the PWM.


Sunday, April 27, 2014

Adding A Custom Pedal and Stand Modification For A Cowboy CB3200

I am setting up a new leather shop and recently purchased a Cowboy CB3200.  I upgraded the stand (Cowboy 441 stand) but found that I couldn't comfortably sit and work.  I decided to redesign and relocate the pedal and move the machine support column closer to my chair.

I'm very happy with the changes and can now comfortably sit at the machine with my right foot applying the gas and in a comfortable position.

Hopefully this will provide a solution if you use one of these commercial stands, but would like to work from a sitting position.

This is a post about the process:

Completed modification with machine support column moved forward
and the redesigned foot pedal installed.

Original pedals and support column position.
The column is mounted centered front to back which makes the machine hard to reach from a seated position.  Also, the legs on my chair would hit the metal base preventing me from scooting up to the machine.  Note that the presser foot pedal is operated by the right foot and the gas pedal is operated by the left foot which is awkward... probably due to driving a car.


The machine had to be supported to remove the base plate for drilling.  Here, a couple of 1 x 4s span two saw horses.  The 1 x 4 nearest the support column had to be notched for the bolts protruding through the bottom of the table.

Clamps were used on the 1 x 4 nearest the support column to compensate for any weakening due to the notches.  Shims were also used to keep the board flat and square to the table.

I used paint stir sticks to left the machine just high enough to get the weight off the casters, then unbolted the base plate and slid it over one set of holes to the front.  

I also needed to drill holes for the pedal.  Blocks were used to support the machine support column.


Using what were the front holes to bolt down the back of the column, the column was moved forward about 4 1/2 inches.  A tri-square was used to square the column to the base and then a drill about the same size as the column base holes was used to mark the new front hole centers.


All holes drilled and tapped.
This machine used 10mm 1.5 thread pitch bolts to secure the column to the base.  Irwin has a tap and drill set for about $6.00.  The drill that came with the tap is an R (8.5mm).


Column Reattached


Before taking the stand apart, I took some measurements of my foot position, angle, and distance from my chair and designed a top-hinged pedal.  It is constructed from plywood.  If anyone is interested in the plans, let me know and I'll post them.  It took about two hours to build.  

The pedal is secured to the base using two 5/16-18 bolts.  This requires a 17/64 drill bit.  Don't forget to use oil while drilling and tapping the holes.  I had some 3-in-1 oil which worked fine.


Here is the project finished and placed back in the shop with the chair.


Yours truly comfortably sitting and operating the foot pedal
and the machine in a much better position.